ApiRTC Access token : Using JSON Web Token (JWT) for session authentication
Last Updated on May 31, 2021
We often receive questions about tokens. Tokens are used to authenticate each endpoint to the ApiRTC platform service and enable sessions. We’ll answer some frequently asked questions regarding tokens in this article.
Table of Contents
Overview
What is a token?
Access tokens are short-lived tokens that can be used to authenticate ApiRTC clients. There are created on the server to grant access to client API features. All tokens have a limited lifetime, configurable up to 24 hours. However, it is recommended to generate tokens with the shortest lifetime suited to the application.
What are the benefits of token-based authentication?
Token-based authentication is very secure and extremely flexible.
Tokens are a way for you to authenticate your users in the ApiRTC platform without sharing any end-user information. Once you have authenticated your users you can decide when to permit them to join a video session.
JSON Web Token
JSON Web token is an open standard defining a compact and self-contained way for securely transmitting information between parties as a JSON object.
This information can be verified and trusted because it is digitally signed. When tokens are signed are signed using private/public key pairs, the signature also certifies that only the party holding the private key is the one that signed it.
JSON Web Tokens are particularly useful in the following scenarios:
- Authorization: This is the most common usage. Once the user is logged in, each subsequent request will include the JWT, allowing the user to access services permitted with that token. SSO (Single Sign On) is a feature using widely JWT for instance, because of its ability to be easily shared between different domains.
- Information Exchange: JSON Web Tokens are a good generic way of securely transmitting information. JWTs can be signed and additionally as the signature is calculated using the header and the payload, you can also verify that the content has not been tampered with.
How does JSON Web Token fit in ApiRTC authentication
Call flow
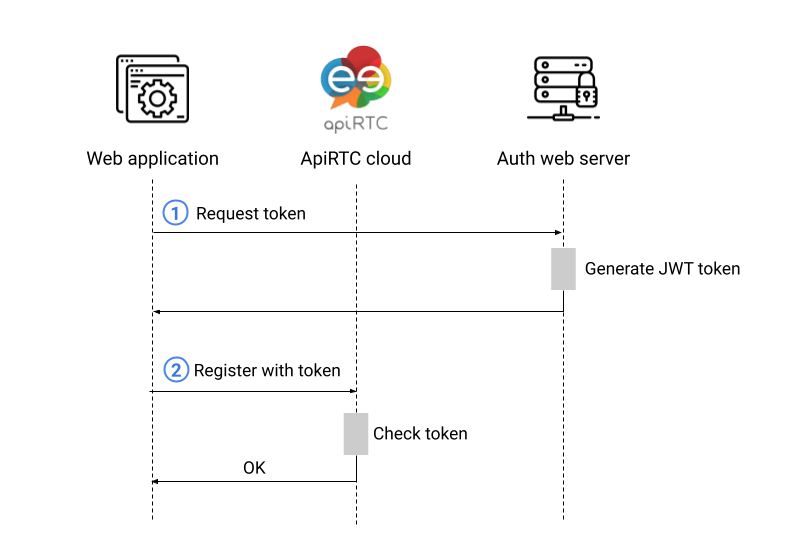
The authentication call-flow is illustrated below:

How to generate a JSON Web Token for your ApiRTC client application?
The following source code shows you how to create the access token needed for your ApiRTC application to authenticate users with a node.js server. This sample can easily be adapted to any authentication server.
This sample code is also available in our Apizee Github repository
We will use jsonWebToken module available on npm in this sample:
npm install jsonwebtoken
AccessToken.js implements the JSON Web token generation as ApiRTC expects it:
const jwt = require('jsonwebtoken');
const uuidv4 = require('uuid/v4');

function AccessToken(apiKey, secret, options) {
    if (!apiKey) {
        throw new Error('apiKey is required');
    }
    if (!secret) {
        throw new Error('secret is required');
    }
    options = options || {};

    this.apiKey = apiKey;
    this.secret = secret;
    this.audience = options.audience || 'apiRTC';
    this.ttl = options.ttl || 3600;
    this.apiRTC_UserAgent_Id = options.apiRTC_UserAgent_Id;
}

AccessToken.ALGORITHM = 'HS256';
AccessToken.prototype.toJwt = function() {
    let payload = {
        grants: {
            apiRTC_UserAgent_Id: this.apiRTC_UserAgent_Id
        }
    };

    return jwt.sign(payload, this.secret, {
        header: {
            typ: 'JWT'
        },
        algorithm: AccessToken.ALGORITHM,
        subject: this.apiKey,
        audience: this.audience,
        expiresIn: this.ttl,
        jwtid: uuidv4()
    })
};
module.exports = AccessToken;
main.js shows how to actually produce (and verify) a JSON Web Token, using AccessToken:
const AccessToken = require("./AccessToken.js");
const jwt = require('jsonwebtoken');

// CUSTOMIZE :
const apiKey = 'YOUR_APIKEY';
const secret = 'YOUR_SECRET_KEY';
const userId = "YOUR_USER_ID";
// OR, to enable token usage for all your users
//const userId = "ApiKey_Token";

let token = (new AccessToken(apiKey, secret, {apiRTC_UserAgent_Id: userId, ttl: 7200})).toJwt();
console.log('token: ' + token);

const VERIFY_DELAY = 1000;
setTimeout(() => {
    console.log(jwt.verify(token, secret, {algorithms: ['HS256']}));
}, VERIFY_DELAY);
Theses parameters MUST be customized:
– apiKey: needs to be set with your apiKey value.
– secret: needs to be set with your secret key value (see below how to get it).
– userId: needs to be set with the user id to be linked with the token, or it can be set to the value “ApiKey_Token” if you want to use the token for all your users (token will be linked to your apiKey and valid for all your users).
Note that if userId is set with an actual user id, the same id MUST be used at step 2. in the callflow as the id parameter of the userAgent.register({id : ... method call.
How to get an apiKey?
Connect with your account on cloud.apirtc.com . The apiKey can be found in “Api->Credentials” left menu.
How to get a secret key?
Secret key can be generated from ApiRTC dashboard. Connect with your account on cloud.apirtc.com and from the “Api->Authentication” left menu :

Need some help?
If you have questions with this feature, we are happy to help, contact us on chat or post your support request on stackoverflow.


